Biomedical Research Hub Documentation

1. The Biomedical Research Hub
The Biomedical Research Hub (BRH) is a cloud-based and multifunctional web interface that provides a secure environment for discovery and analysis of scientific results and data. It is designed to serve users with a variety of objectives, backgrounds, and specialties.
The BRH represents a dynamic Data Ecosystem that aggregates and hosts metadata from multiple resources to make data discovery and access easy for users.
The platform provides a way to search and query over study metadata and diverse data types, generated by different projects and organizations, and stored across multiple secure repositories.
The BRH also offers a secure and cost-effective cloud-computing environment for data analysis, empowering collaborative research and development of new analytical tools. New workflows and results of analyses can be shared with the community.
The BRH is powered by the open-source software “Gen3”.

Gen3 was created by and is actively developed at the University of Chicago’s Center for Translational Data Science (CTDS) with the aim of creating interoperable cloud-based data resources for the scientific research community.
2. Types of shared Data
The BRH provides secure access to study metadata from multiple resources (Data Commons) and will be the driving engine for new discovery. The types of data represented are diverse and include scientific research across multiple disciplines.
The BRH aims to make data more accessible by following the "FAIR" principles:
Findable
- Researchers are provided an intuitive interface to search over metadata for all studies and related datasets.
- Each study and dataset will be assigned a unique, persistent identifier.
Accessible
- Authenticated users can request and receive access to controlled-access data by data providers.
- Metadata can be accessed via an open API.
Interoperable
- Data can be easily exported to various workspaces for analysis using a variety of software tools.
Reusable
- Data can be easily reused to facilitate reproducibility of results, development and sharing of new tools, and collaboration between investigators.
3. Data Management and Repositories
The BRH securely exposes study metadata and data files stored on multiple FAIR repositories and Data Commons, i.e. data libraries or archives, to provide an easy way to connect different repositories on one single location.
FAIR data repositories are traditionally a part of a larger institution/working group established for research, data archiving, and, to serve data users of that organization.
The list of currently shared resources/Data Commons on BRH are accessible here.
4. How to get started
a) BRH Overview
Click on an icon to jump to the section
b) Register for Workspaces
To start exploring BRH Workspaces right away, users can apply for a temporary trial access to BRH workspaces, or extended access to BRH workspaces using NIH STRIDES. Extended access to BRH Workspaces is granted using the NIH STRIDES workspace account, and takes a few weeks to be fully approved. Please see below for more details.
Guidelines for Temporary Trial Access to BRH Workspaces
For new users without workspace access, please follow these steps
- Login to BRH
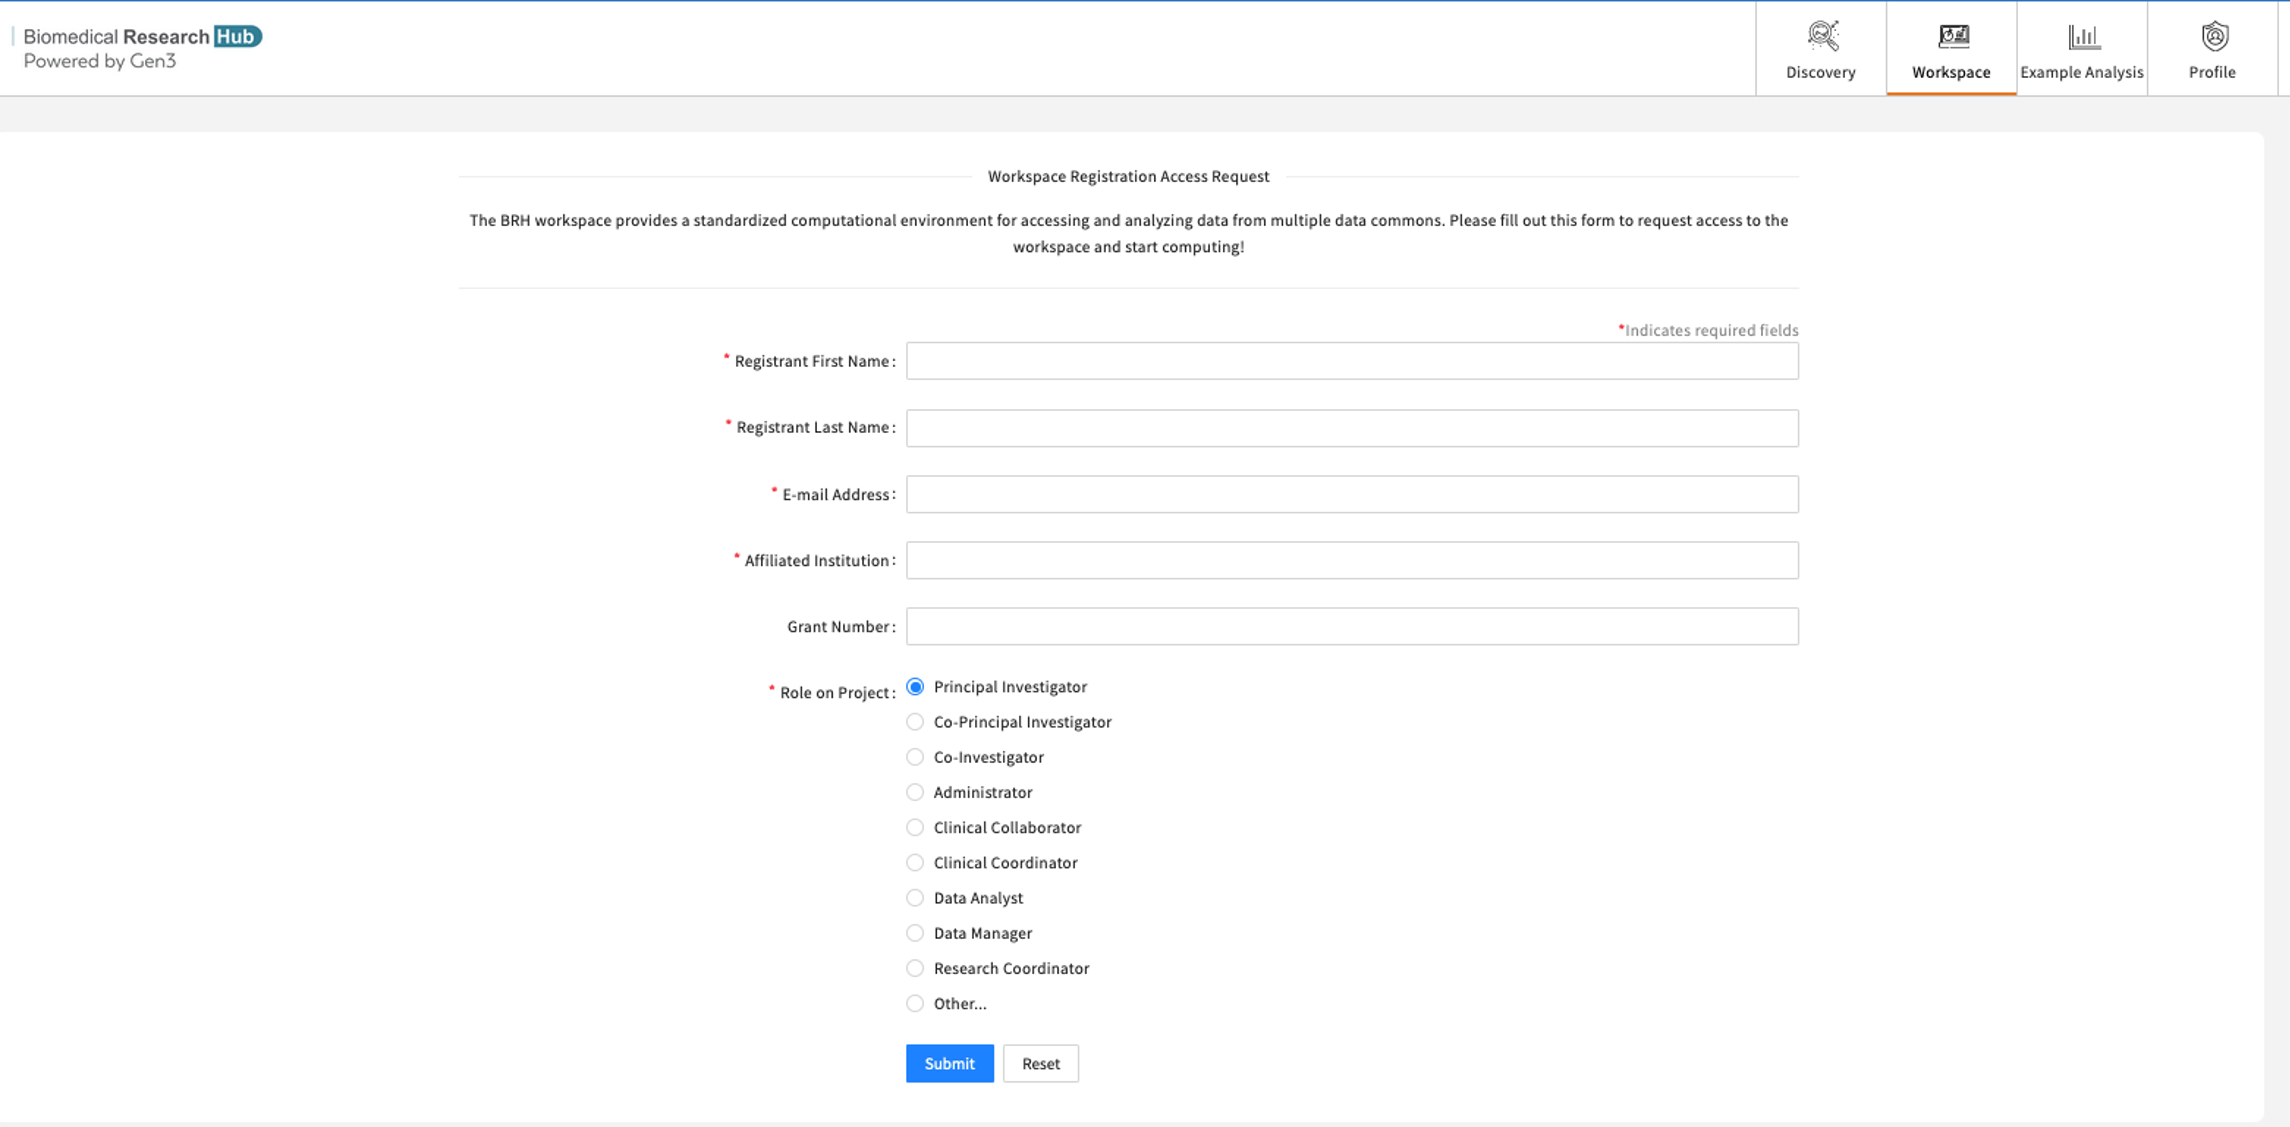
- Click on workspace tab. That opens a workspace registration form
- Fill in the details and submit the form shown below.
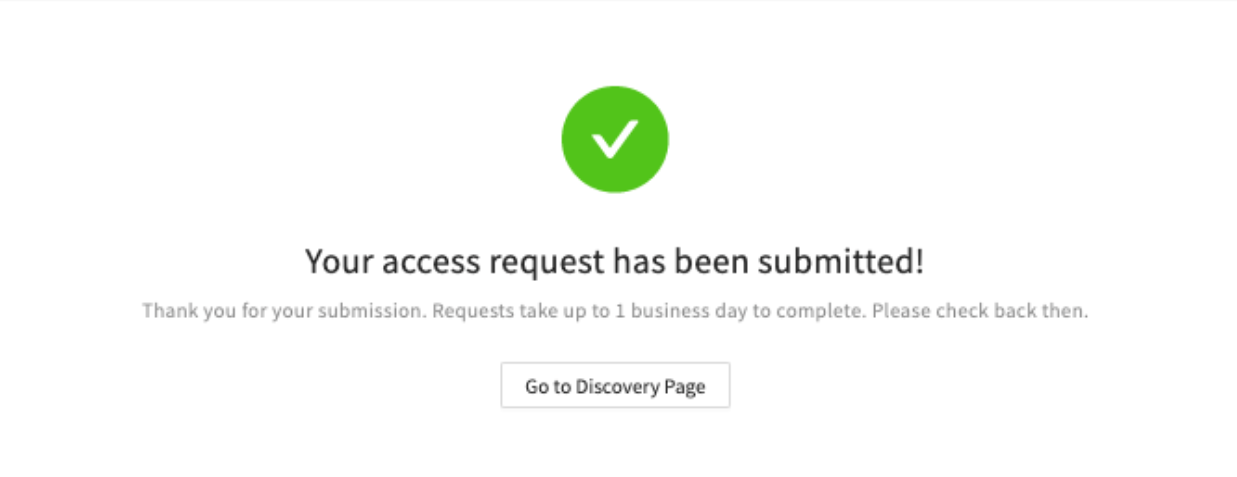
- The form should be filled out only once. Following submission, users should see a success message and a link back to the Discover page.
- Users should receive an email notifying them that the request has been received.
- Once the temporary trial request is approved, users will get another email notifying them of approval. They should be able to access the workspace then. The timeline for approval is typically a few days.
Guidelines for Extended Access to BRH Workspaces using STRIDES
The workspace account is handled with the help of NIH STRIDES (NIH Science and Technology Research Infrastructure for Discovery, Experimentation, and Sustainability). The NIH STRIDES Initiative allows NIH to explore the use of cloud environments to streamline NIH data use by partnering with commercial providers.
By leveraging the STRIDES Initiative, NIH and NIH-funded institutions can begin to create a robust, interconnected ecosystem that breaks down silos related to generating, analyzing, and sharing research data.
NIH-funded researchers with an active NIH award may take advantage of the STRIDES Initiative for their NIH-funded research projects. Eligible researchers include NIH intramural researchers and awardees of NIH contracts, other transaction agreements, grants, cooperative agreements, and other agreements. More information on NIH STRIDES and how to gain access can be found here. Please see below for registration steps
-
Users will receive an invitation via email to register for an NIH STRIDES workspace account. Users can click the link in the invitation email or start requesting a workspace account by visiting. https://brh-portal.org/ and logging in.
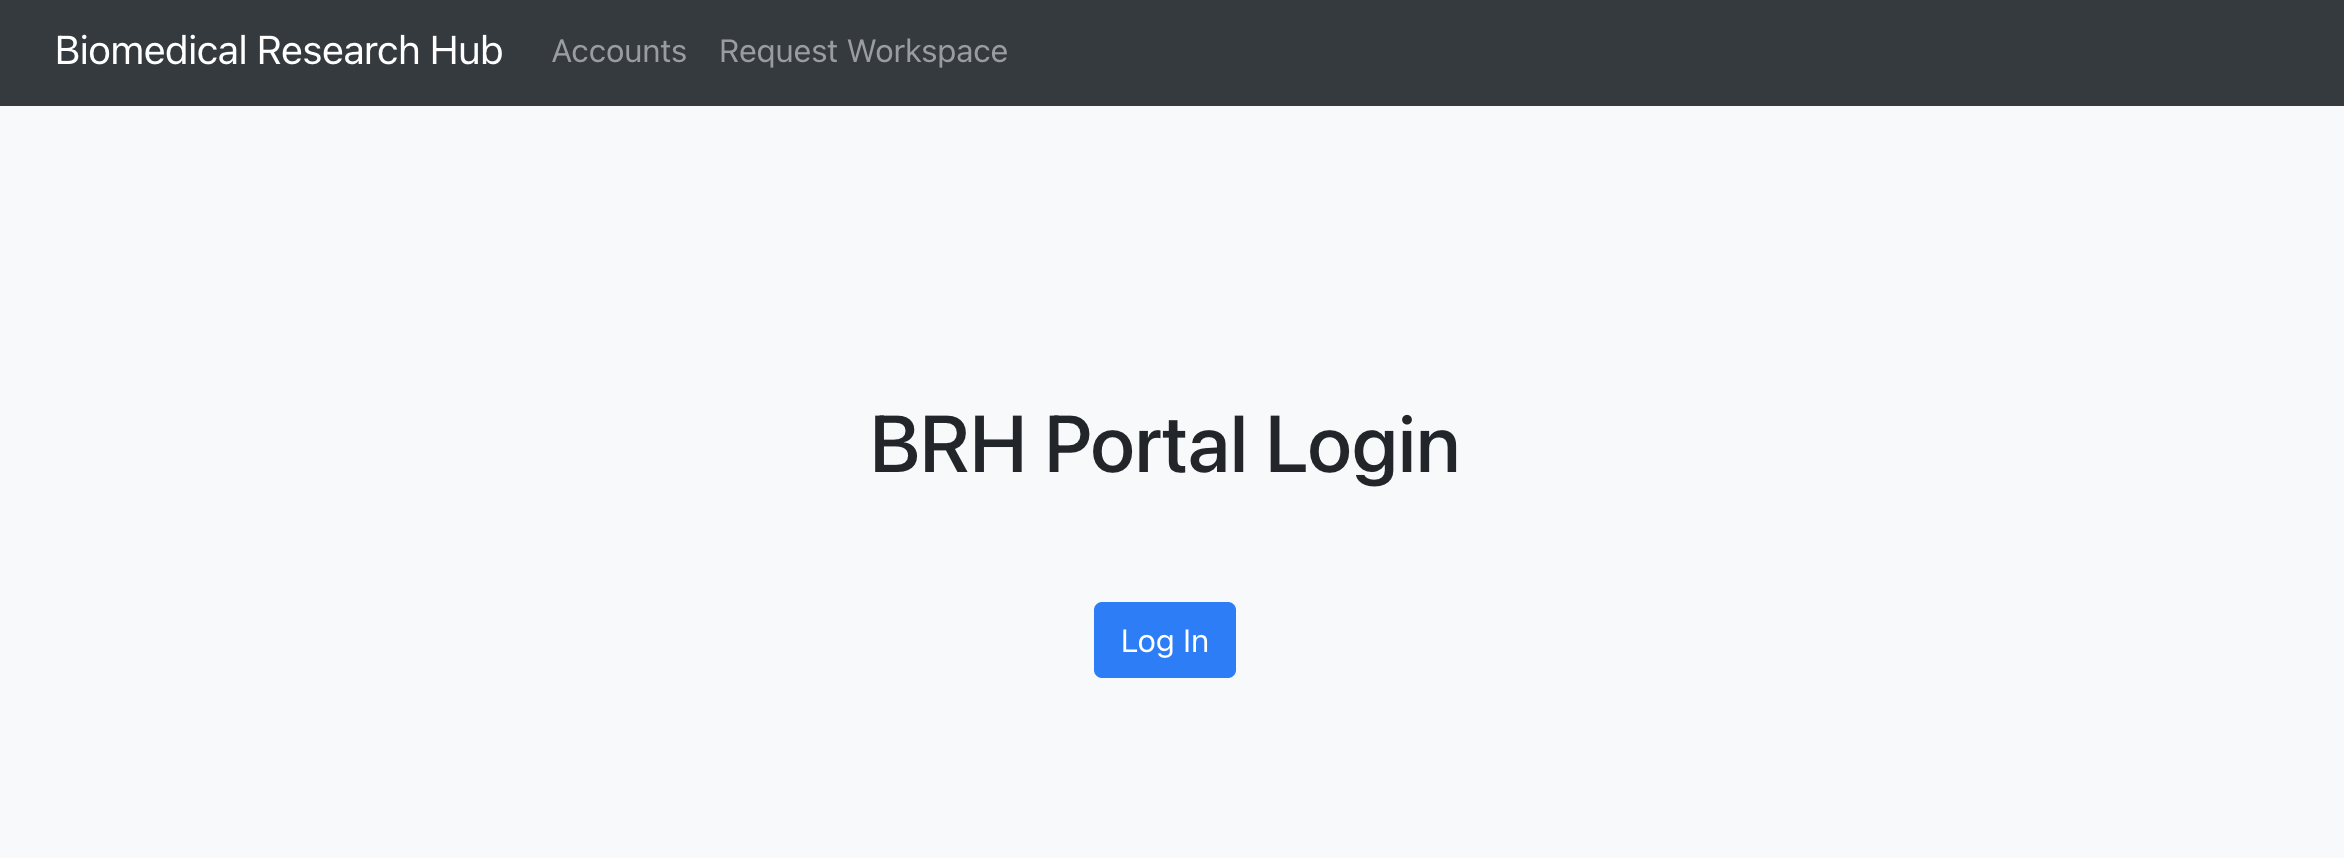
Log in on the BRH Admin Portal.
-
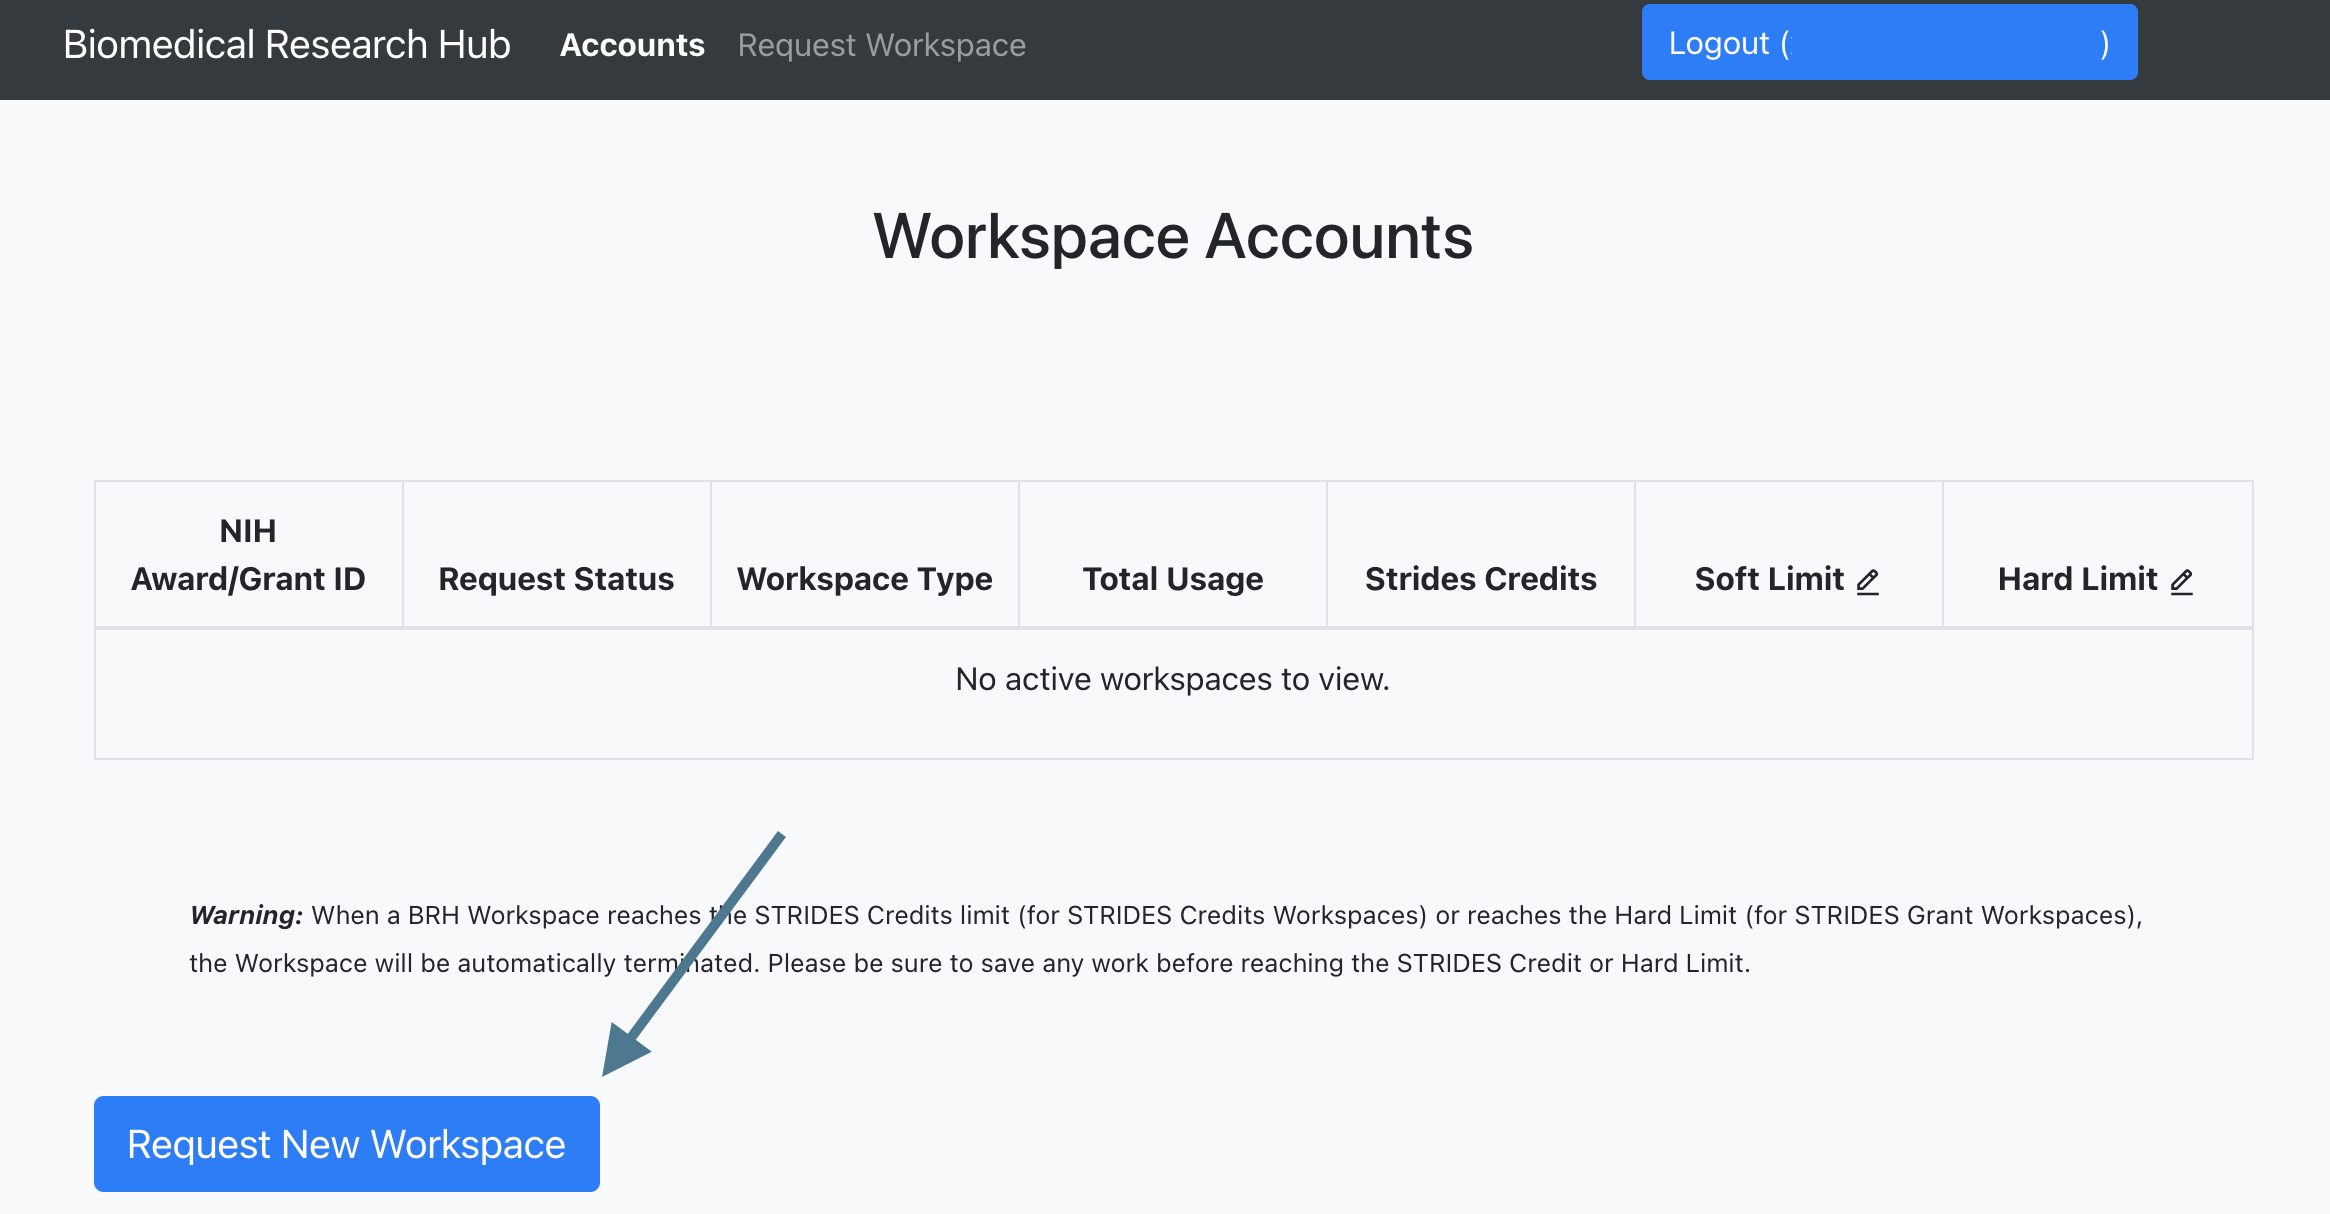
After authorization, users will see the landing page, which displays current workspace accounts and credits once workspaces access and credits/grants have been approved.
To start the process of requesting a new workspace account, users need to select "Request New Workspace" on the landing page.
-
Choose one of the two options a) STRIDES Grant/Award Funded or b) STRIDES Credits to request a workspace account.

For information on the NIH STRIDES options, please refer to the official page.
-
The STRIDES Grant/Award Funded form can be selected if researchers have received NIH funding (e.g. a grant, contract, cooperative agreement, or other transaction agreement)
and intend to use these funds for the BRH account. With this option, the researchers' organization will be responsible for payment.
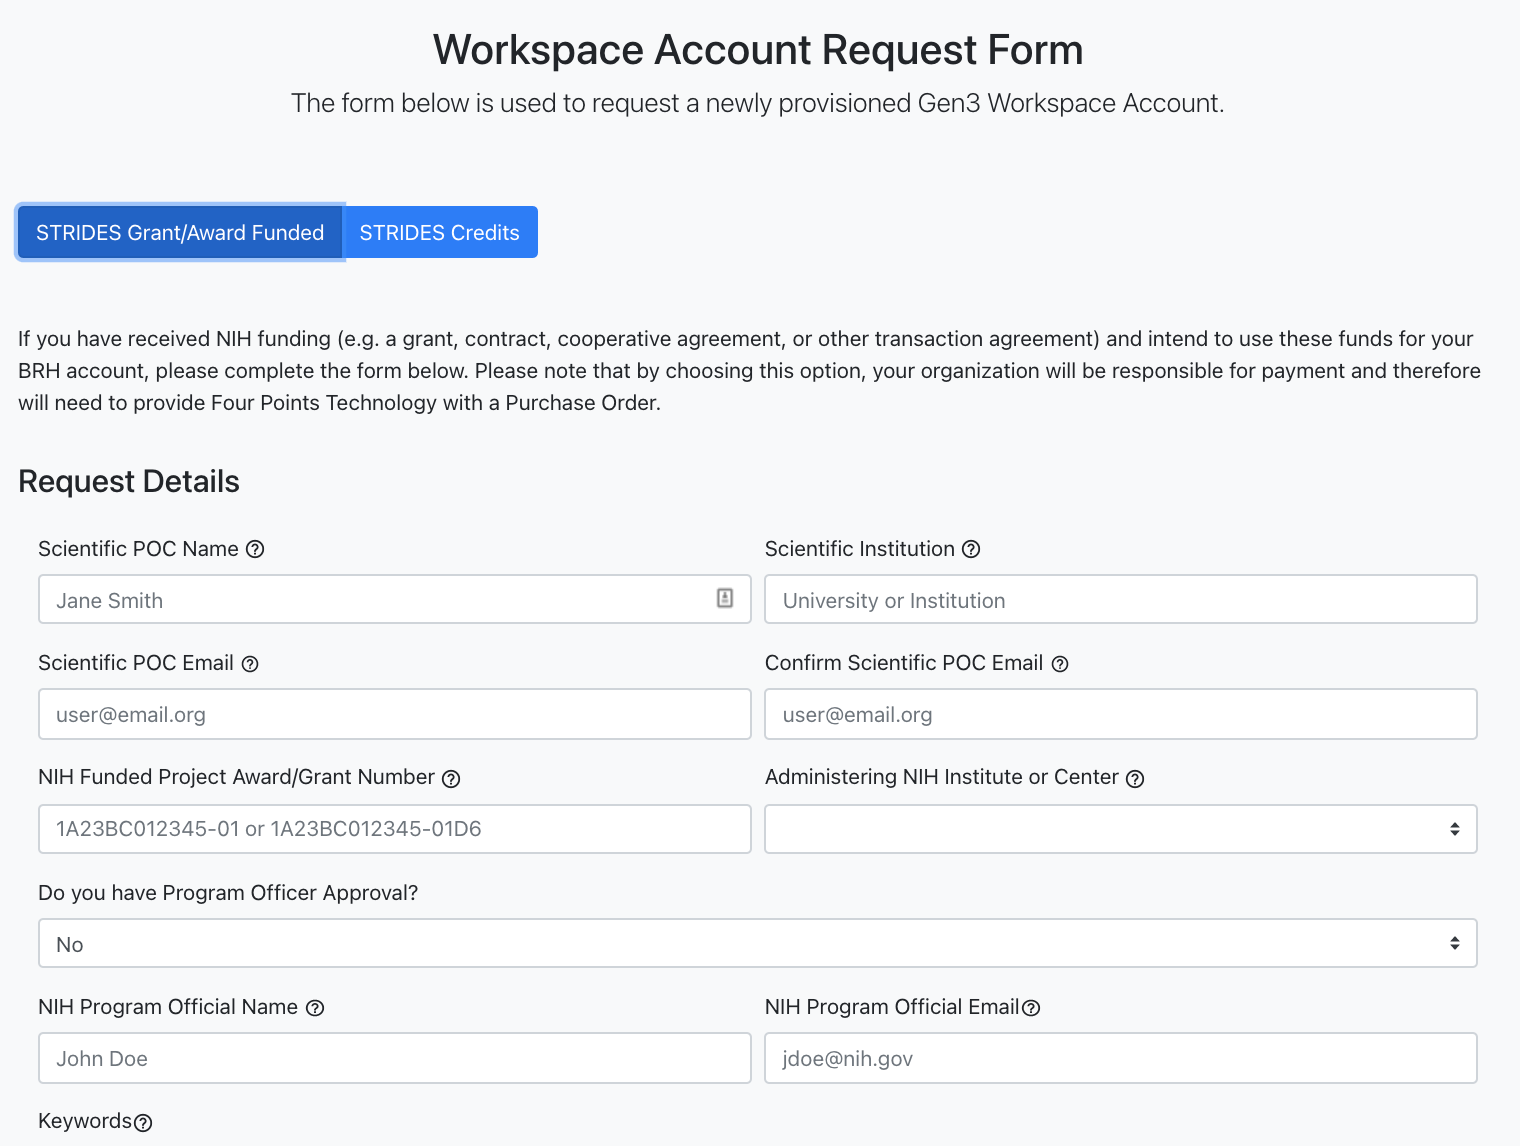
Request form for "STRIDES Grant/Award Funded".
-
The STRIDES Credits form can be selected if users are requesting credits from the NIH STRIDES Initiative for the BRH account. With this option, once the request is approved,
a new account with a spending limit of $XXX will be provisioned for usage.
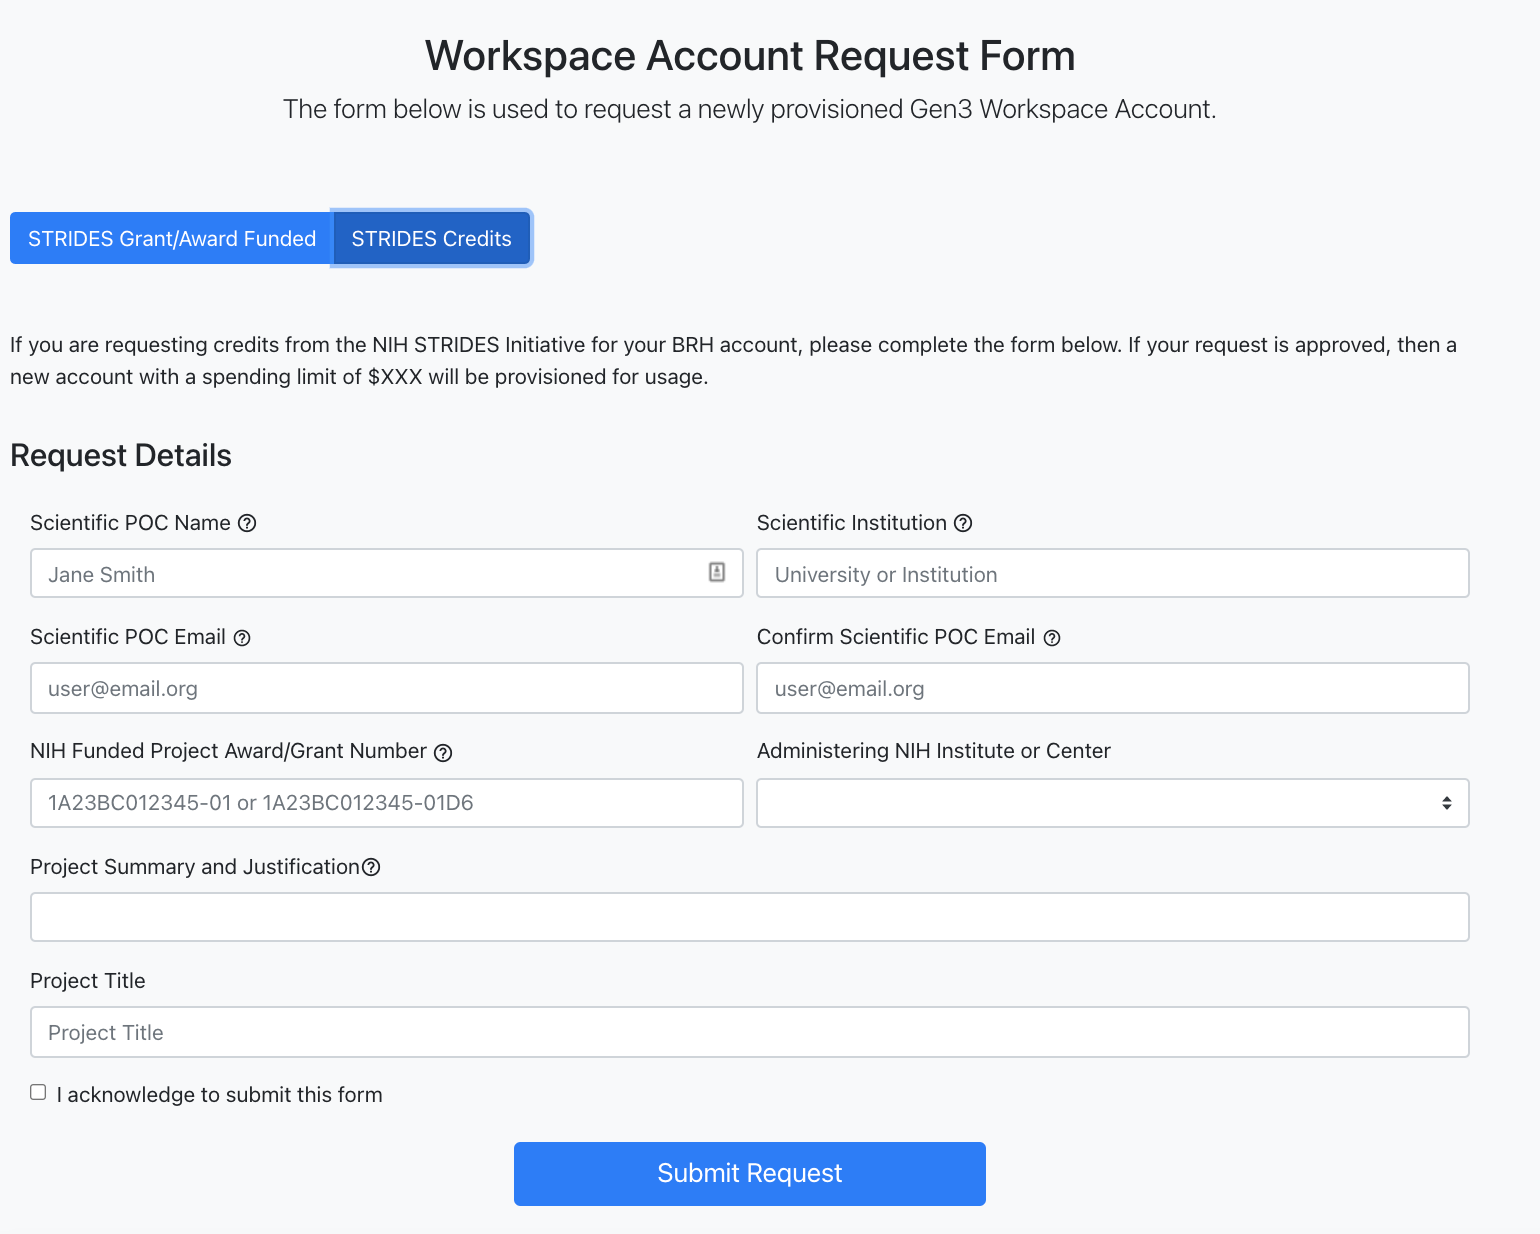
Request form for "STRIDES Credits".
- Submit the request. Note that the process of granting access for a workspace account can take up to two weeks and users will be notified. Following the approval, users will see the current workspace accounts and credits on the landing page.
c) Login Page
You will not need to log in in order to:
- Browse the study metadata on the Discovery Page
You will need to log in and obtain authorization (access) in order to
- access studies with controlled data
- perform analyses in workspaces
- download data files and file manifests
- run interactive tutorial notebooks in workspaces
Start by visiting the login page (https://brh.data-commons.org/login).
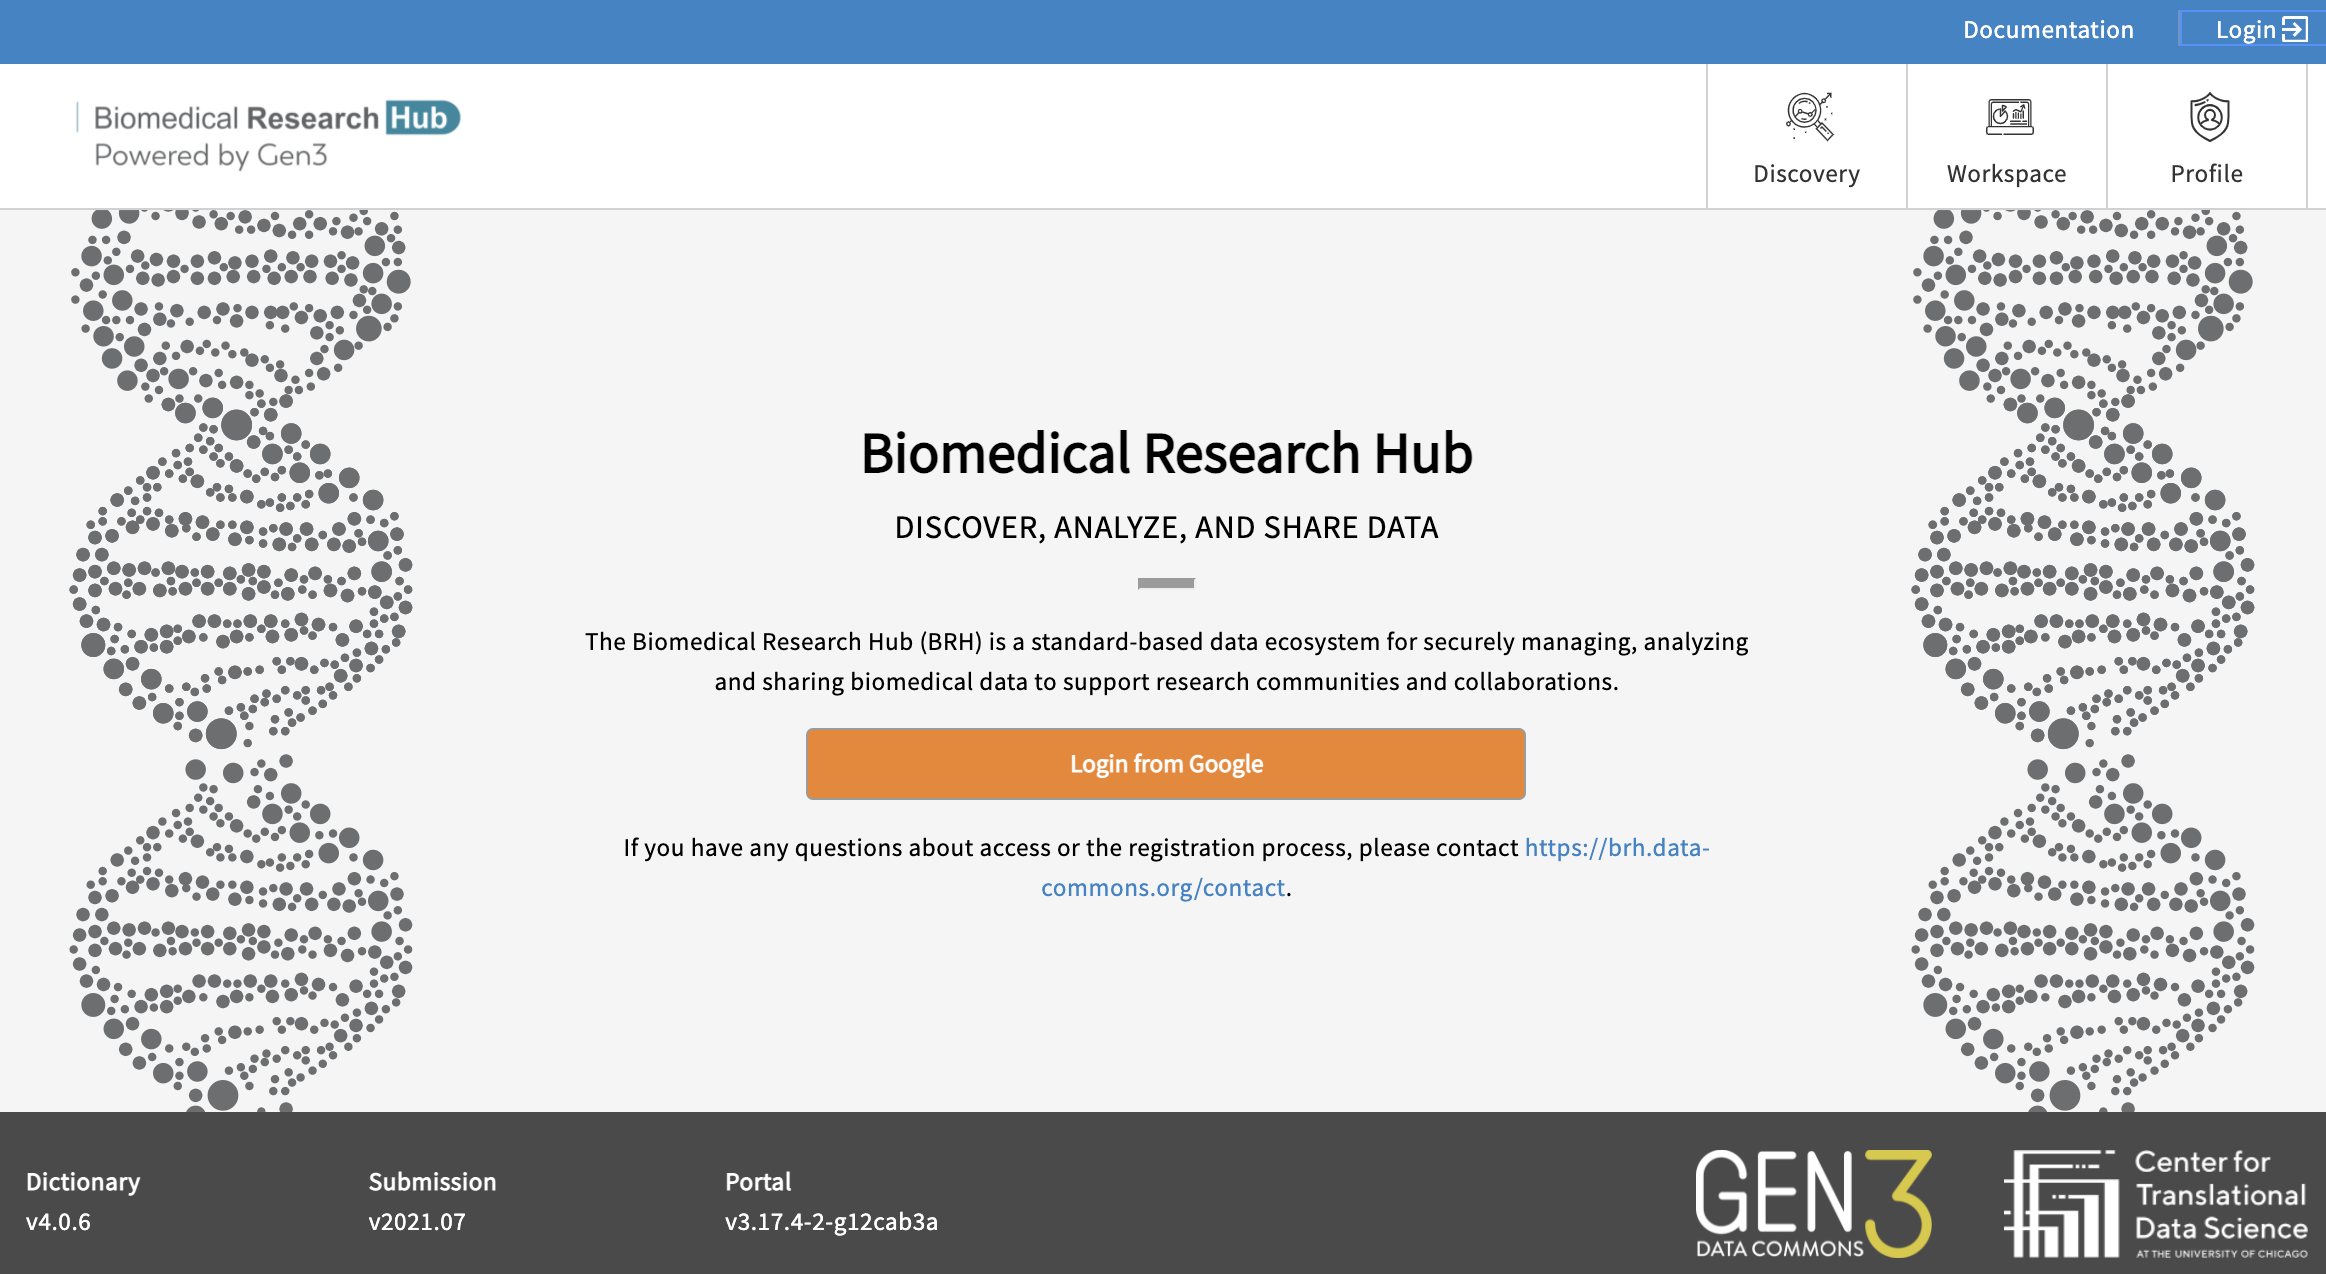
- Login from Google: You may login using any Google account credentials, or a G-suite enabled institutional email. This option may or may not be available depending on the institution or organization the user is associated with.
- Login via InCommons --> NIH eRA: When selecting the NIH/eRA (electronic Research Administration) login using InCommons, you will need access permissions through the eRA Commons account.
After successfully logging in, your username will appear in the upper right-hand corner of the page.
d) How to check and request Access
Users can find out to which projects they have access to by navigating to the Discovery Page and by selecting through the column filters at the top of the table.
Access to individual Studies
You can check access by clicking on a study in the Discovery Page, as shown below:
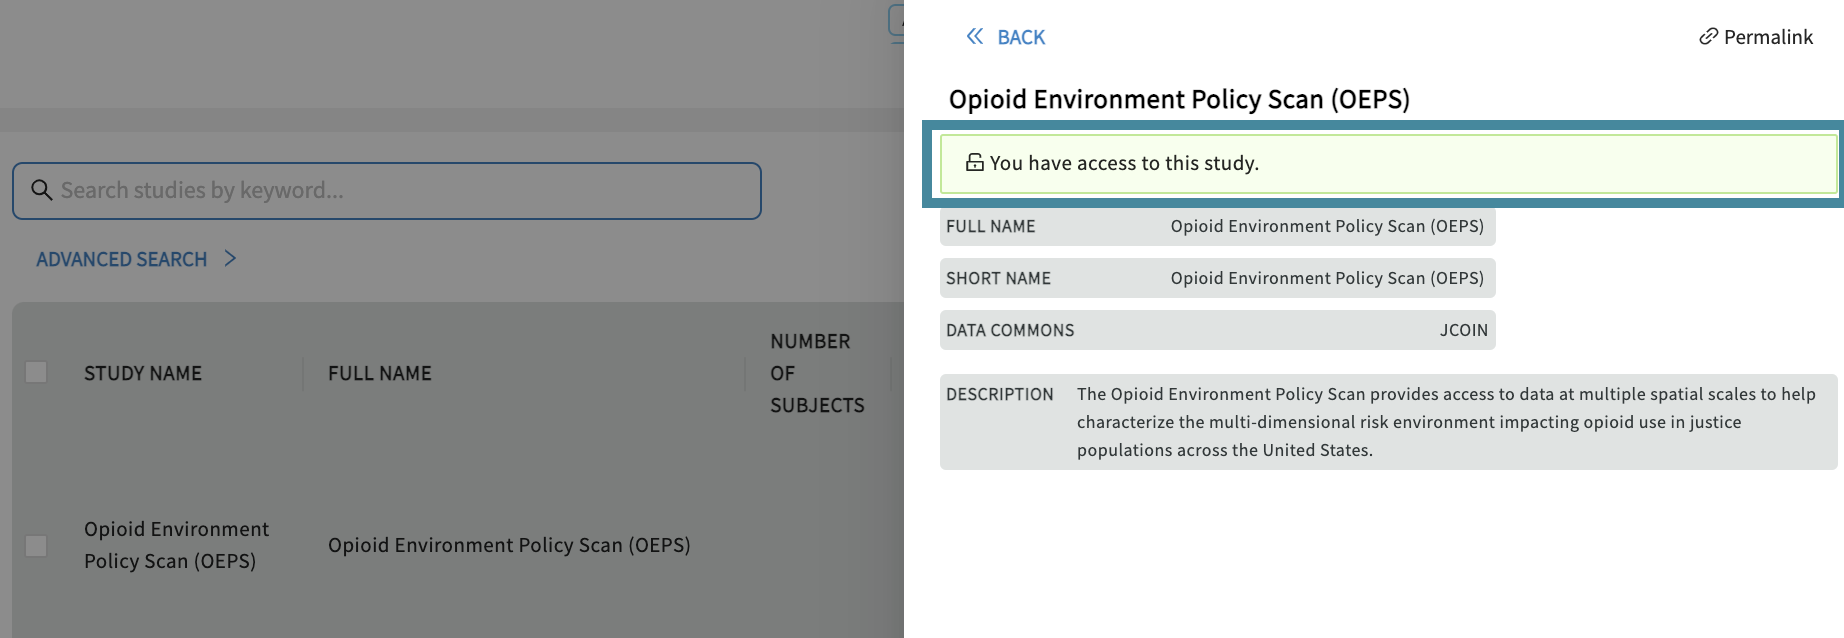
If you have access, a green box will show “You have access to this study”.

Note: If you have access but cannot select the study to export to workspace, it is because the manifest is not yet available. Please use API for these cases.
Linking Access to FAIR enabled Repositories/Resources
BRH securely exposes data stored on multiple FAIR repositories, resources, and Data Commons.
Users need to link their account to currently all resources/repositories in order to:
- run Jupyter Notebooks that utilize data stored on various FAIR repositories.
- export data that is stored on FAIR repositories from the Discovery Page to the Workspaces.
- download data that is stored on FAIR repositories from the Discovery Page.
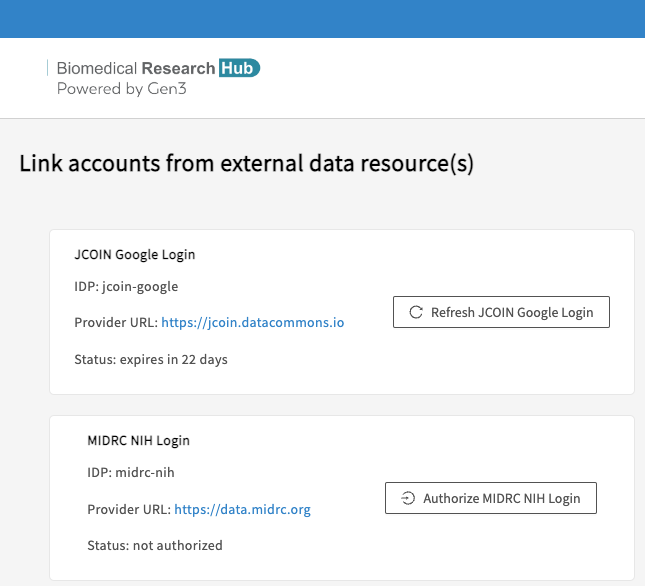
Access needs to be renewed after 30 days, as indicated after "Status: expires in [..] days".
e) Discovery Page
The Discovery Page provides users a venue to search and find studies and datasets displayed on the Biomedical Research Hub. Users can browse through the publicly accessible study-level metadata without requiring authorization.
Use text-based search, faceted search, and tags to rapidly and efficiently find relevant studies, discover new datasets across multiple resources, and easily export selected data files to the analysis workspace.
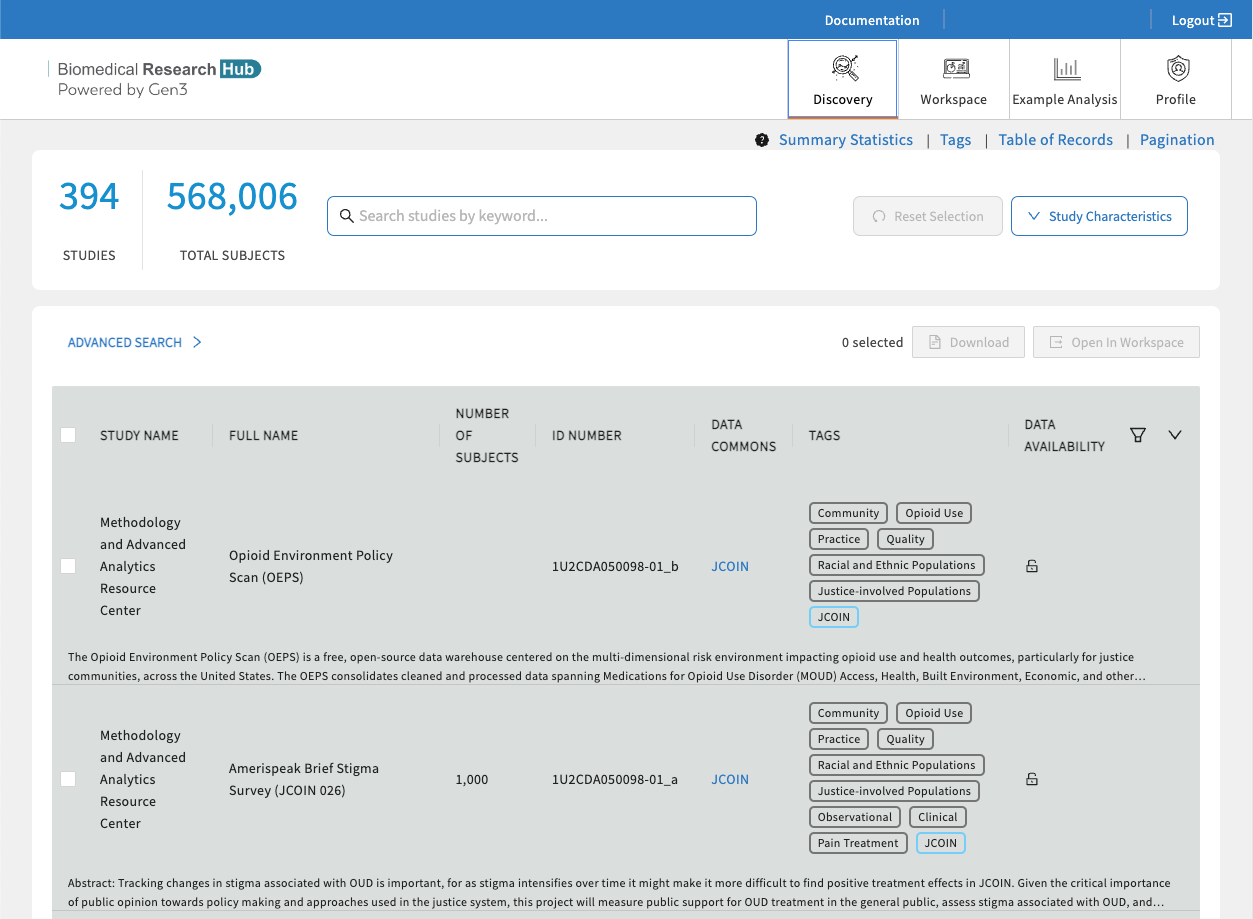
Search Features
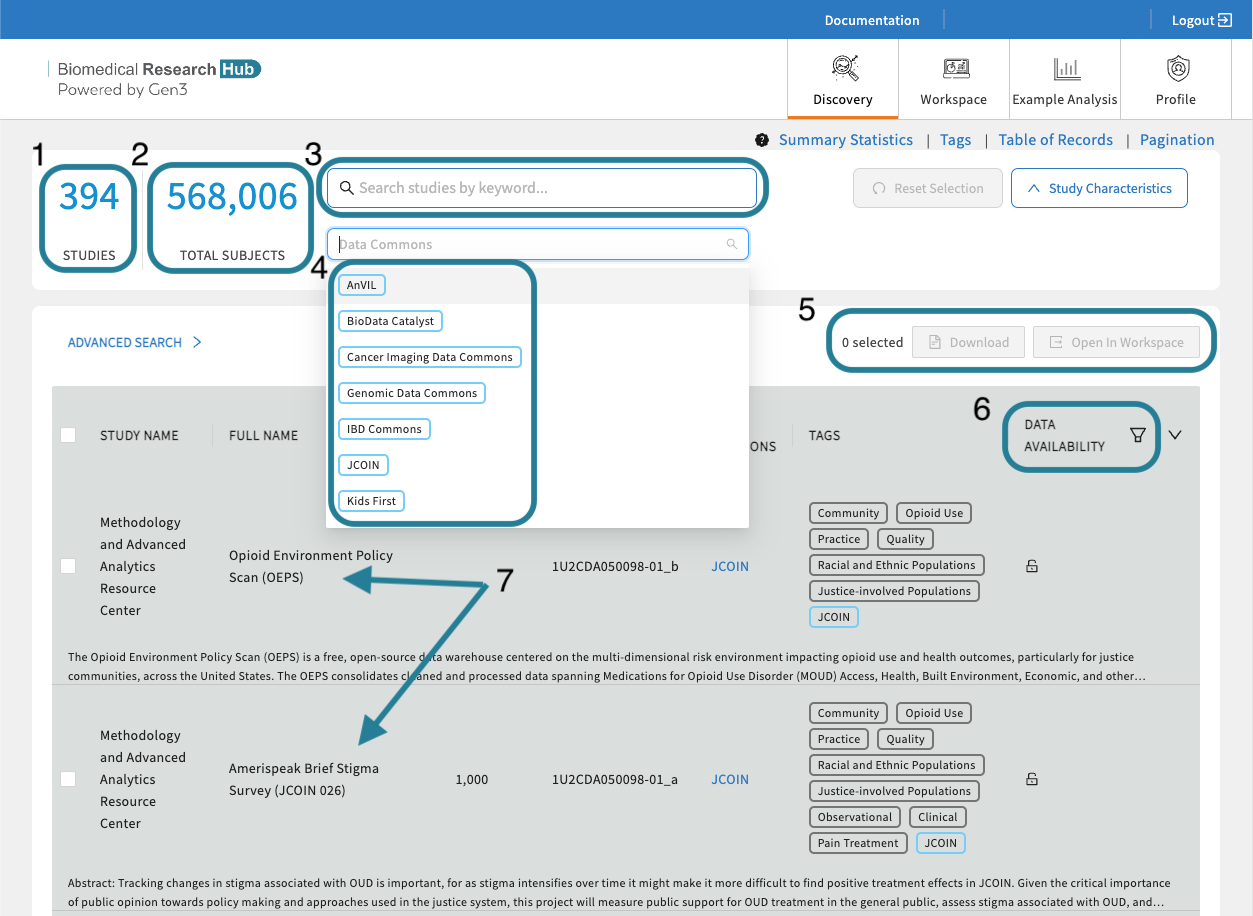
- The total number of studies. Shows the amount of studies the BRH is currently displaying.
- The total number of subjects. Shows the amount of subjects the BRH is currently displaying.
- Free Text Search. Finding studies is made easy using keywords in the free text-based search bar or using tags. The free-text search bar can be used to search for study name, ID number, Data Commons, or any keyword that is mentioned in the metadata of the study.
- Data Resources/Data Commons Tags. Viewed by selecting "Study Characteristics". Click on a tag to filter by a Data Resource/Data Commons. Selecting multiple tags work in an "OR" logic.
- Export Options. Login first to leverage the export options. Select one or multiple studies and download a file manifest or export the data files to a secure cloud environment "Workspaces" to start your custom data analysis in Python or R.
- Data Availability. Filter on available, pending, and not-yet-available datasets. Read further here.
- Studies. This table feature presents all current studies on BRH. Click on any study to show useful information about the study (metadata). Read further here.
Find available Study-level Metadata
Finding available study-level metadata on BRH is made easy by clicking on a study.
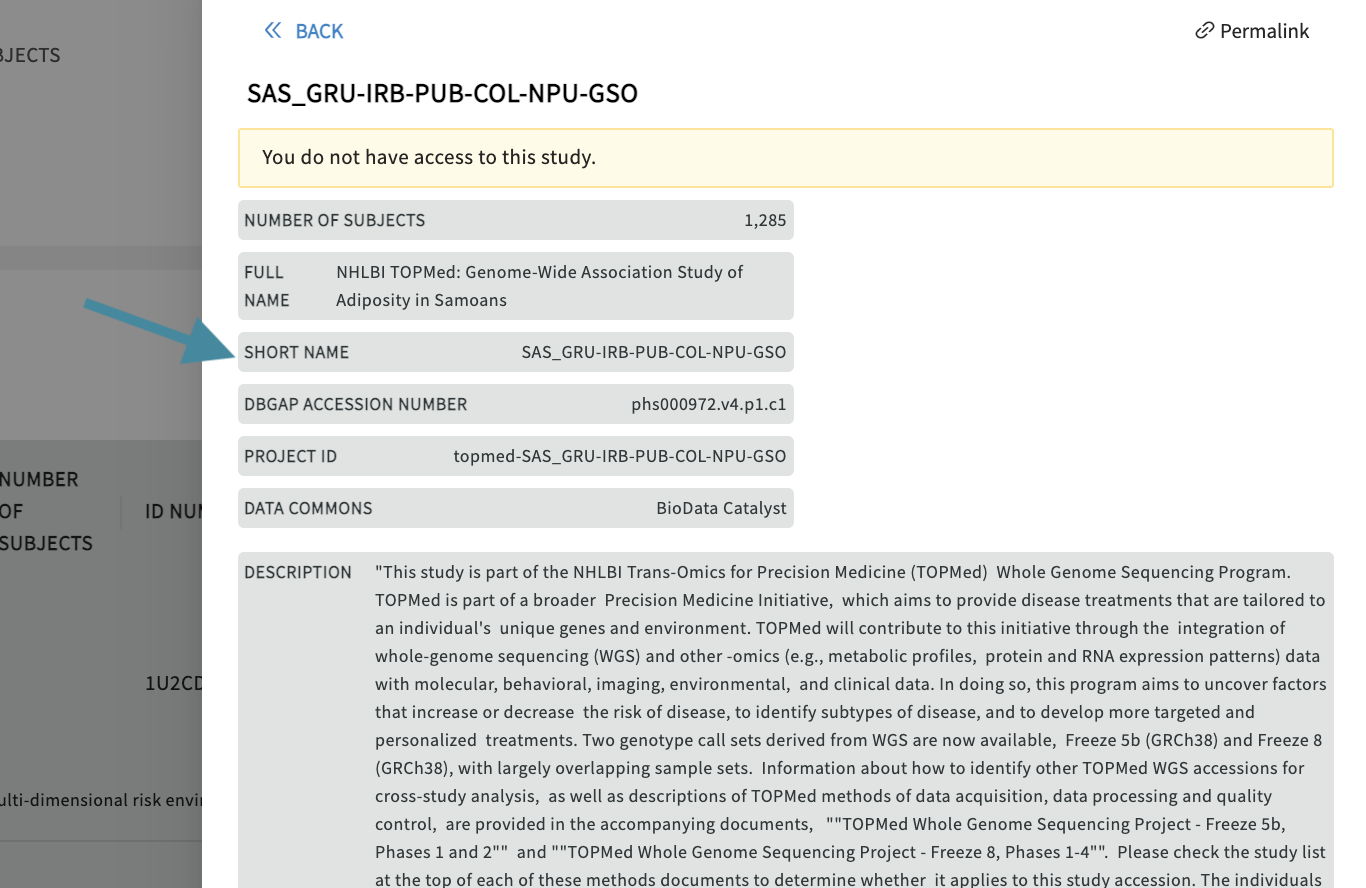
Find accessible Datasets
Users can select and filter studies from multiple resources and conduct analyses on the selected datasets in a workspace. Users can search but not interact with data they do not have access to. By selecting the data access button in the top right corner of the study page user access can be displayed. The Discovery Page will automatically update the list of studies that are accessible.
f) Workspaces
To use the workspace, users need to register for workspace accounts to use the workspaces, as described above.
BRH workspaces are secure data analysis environments in the cloud that can access data from one or more data resources. By default, Workspaces include Jupyter notebooks, Python and R, but can be configured to host virtually any application, including analysis workflows, data processing pipelines, or data visualization apps.
New to Jupyter? Learn more about the popular tool for data scientists on Jupyter.org (disclaimer: CTDS is not responsible for the content).
Guideline to get started in Workspaces
Once users have access to workspaces, find below a guide of how to get started with analysis work in workspaces.
- Users need to log in via https://brh.data-commons.org/login to access workspaces.
-
After navigating to https://brh.data-commons.org/workspace, users will discover a list of pre-configured virtual machine (VM) images, as shown below.
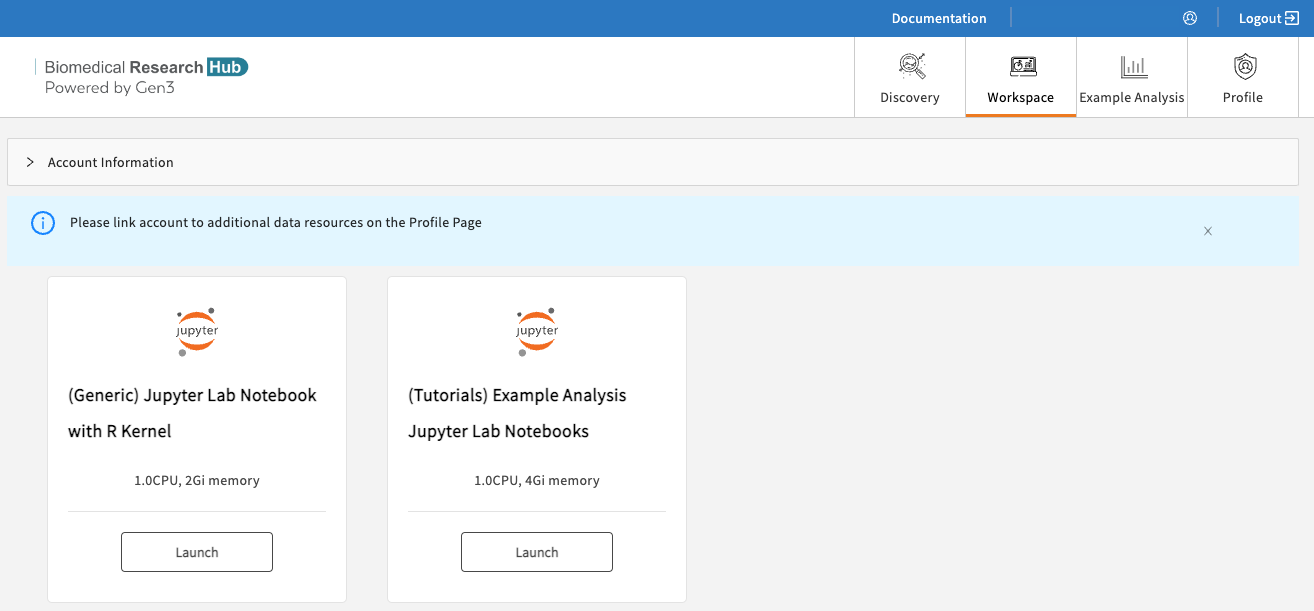
Available workspaces on BRH.
- (Generic) Jupyter Notebook with R kernel: Choose this VM if you are familiar with setting up Python- or R-based Notebooks, or if you just exported one or multiple studies from the Discovery Page and want to start your custom analysis.
- Tutorial Notebooks: Explore our Jupyter Notebook tutorials written in Python or R, which pull data from various sources of the Biomedical Research Hub to leverage statistical programs and data analysis tools.
-
Click “Launch” on any of the above workspace flavors to spin up a copy of that VM. Note: Launching the VM may take several minutes.

The status of launching the workspace is displayed after clicking on “Launch”.
-
After launching, the home folders are displayed, one of which is the user's persistent drive ("pd").
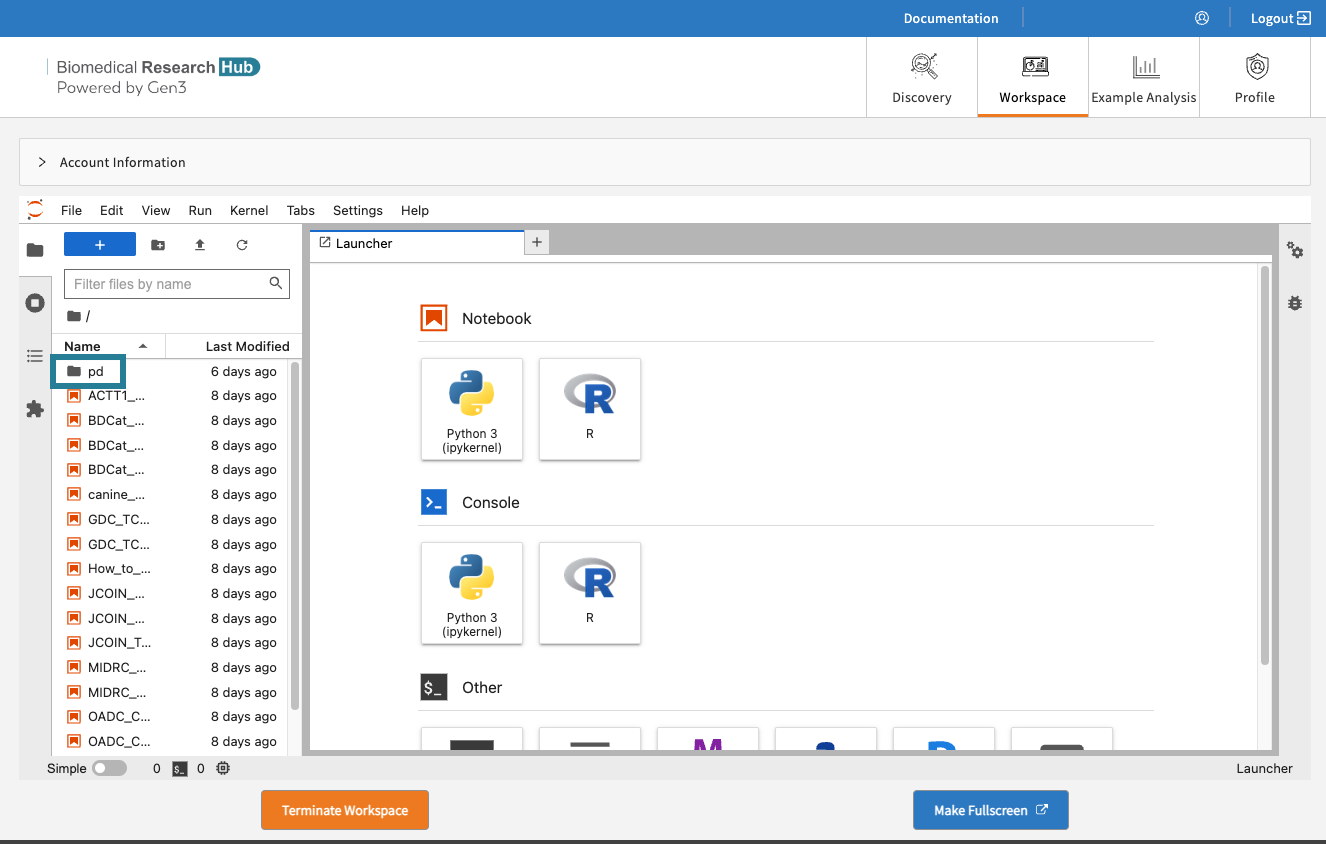
The /pd directory is a user’s persistent drive.
-
Select the /pd folder. Only files saved in the /pd directory will remain available after termination of a workspace session.
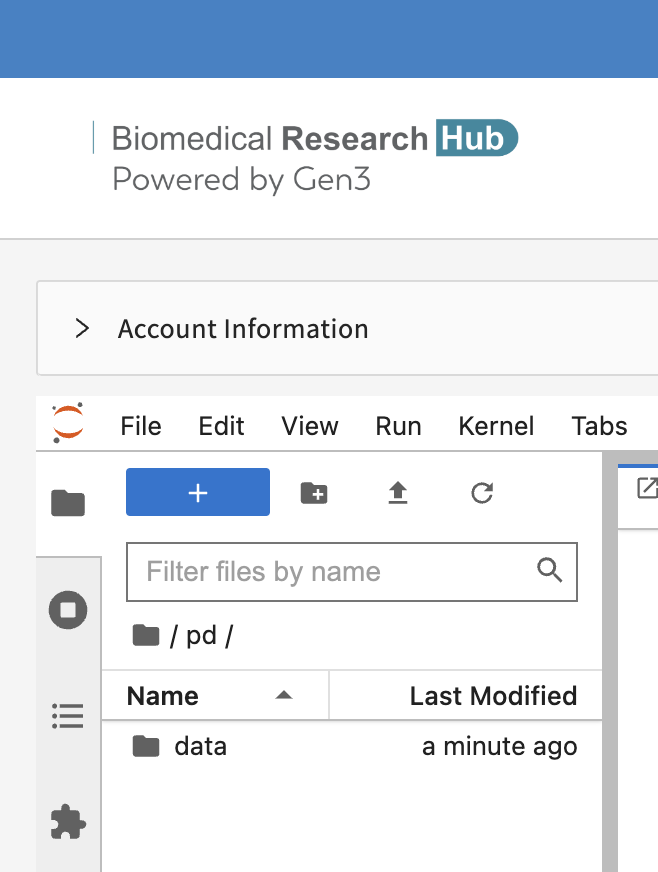
New files or licenses should be saved in the the /pd directory if users need to access them after restarting the workspaces.
- Attention: Any personal files in the folder “data” will be lost. Personal files in the directory /pd will persist.
- Do not save files in the "data" and “data/brh.data-commons.org” folders.
- The folder “brh.data-commons.org” in the “data” folder will host the data files you have exported from the Discovery Page.
-
Start a new notebook by clicking the tiles in the launcher and choose between Python 3 or R Studio as the base programmatic language.
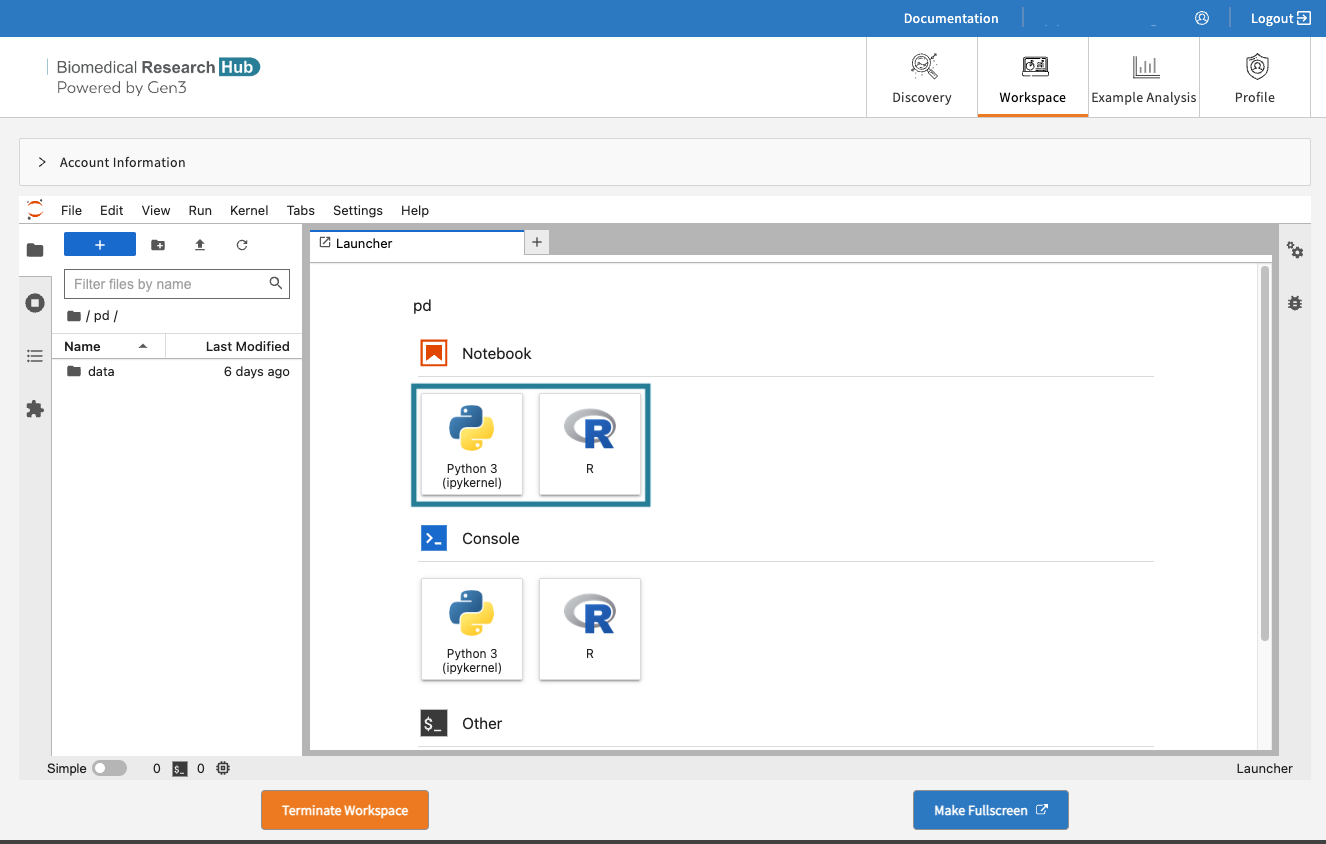
Start a new notebook under “Notebook” in the Launcher tab.
-
Experiment away! Code blocks are entered in cells, which can be executed individually or all at once. Code documentation and comments can also be entered in cells, and the
cell type can be set to support Markdown.
Results, including plots, tables, and graphics, can be generated in the workspace and downloaded as files.
-
Do not forget to terminate your workspace once your work is finished to be mindful of the cost-intensive computational effort.
Note, that Workspaces automatically
shut down after 90 minutes of idle
time.
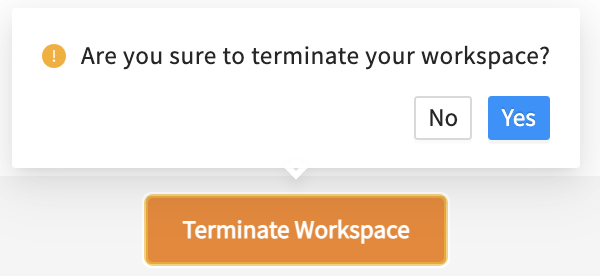
Do not forget to terminate your workspace once your work is finished. Unterminated workspaces continue to accrue computational costs.
Further reading: read more about how to download data files into the Workspaces here.
Upload, save, and download Files/Notebooks
Users can upload data files or Notebooks from the local machine to the home directory by clicking on “Upload” and access them in the Notebook (see below).
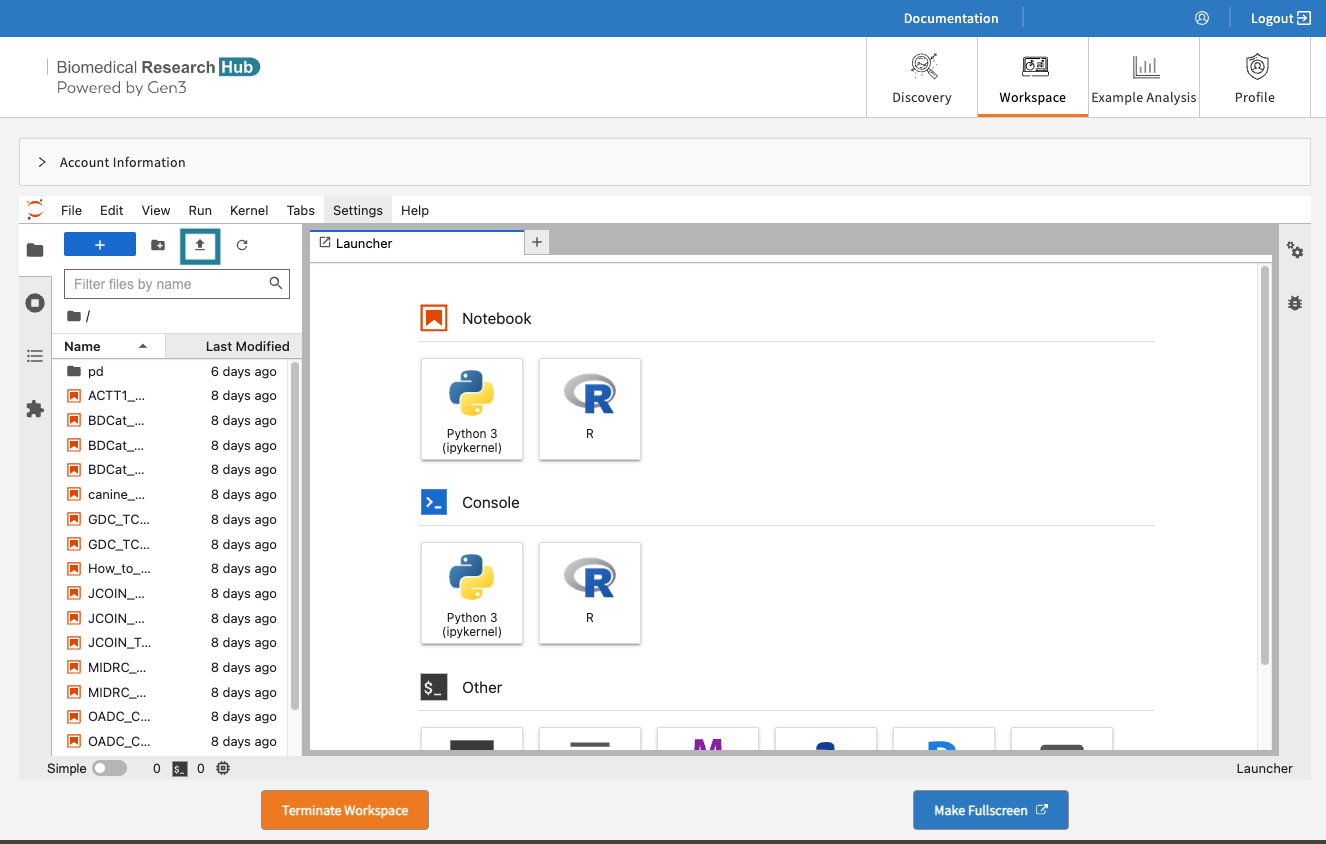
Then run in the cells, for example:
            import os

            import pandas as pd

            os.chdir('/data')

            demo_df = pd.read_csv('/this_is_a_demo.txt', sep='\t')

            demo_df.head()
Users can save the notebook by clicking "File" - "Save as", as shown below.

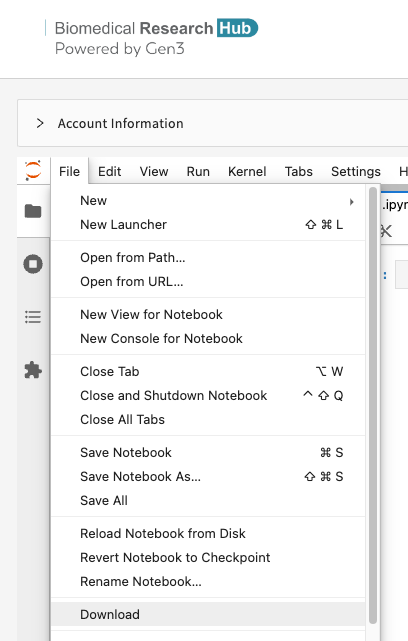
Users can download notebooks by clicking "File" - "Download", as shown below.
Environments, Languages, and Tools
The following environments are available in the workspaces:
-
Jupyter Lab
The following programmatic languages are available in Jupyter Notebooks:
- R
- Python 3
The following tools are available in Jupyter Notebooks:
- GitHub (read GitHub documentation)
Python 3 and R in Jupyter
Both Python 3 and R are available in Jupyter Notebooks.
Users can expect to be able to use typical Python or R packages, such as PyPI or CRAN. For Python and R, users can start a new notebook with a tile under
"Notebook", as shown below.

Automatic Workspace Shutdown
Warning: When a BRH Workspace reaches the STRIDES Credits limit for STRIDES Credits Workspaces or reaches the Hard Limit for STRIDES Grant Workspaces, the Workspace will be automatically terminated. Please be sure to save any work before reaching the STRIDES Credit or Hard Limit.
Warning: Workspaces will also automatically shut down after 90 minutes of idle time and a pop-up window will remind users before the workspace shuts down.

g) Profile Page
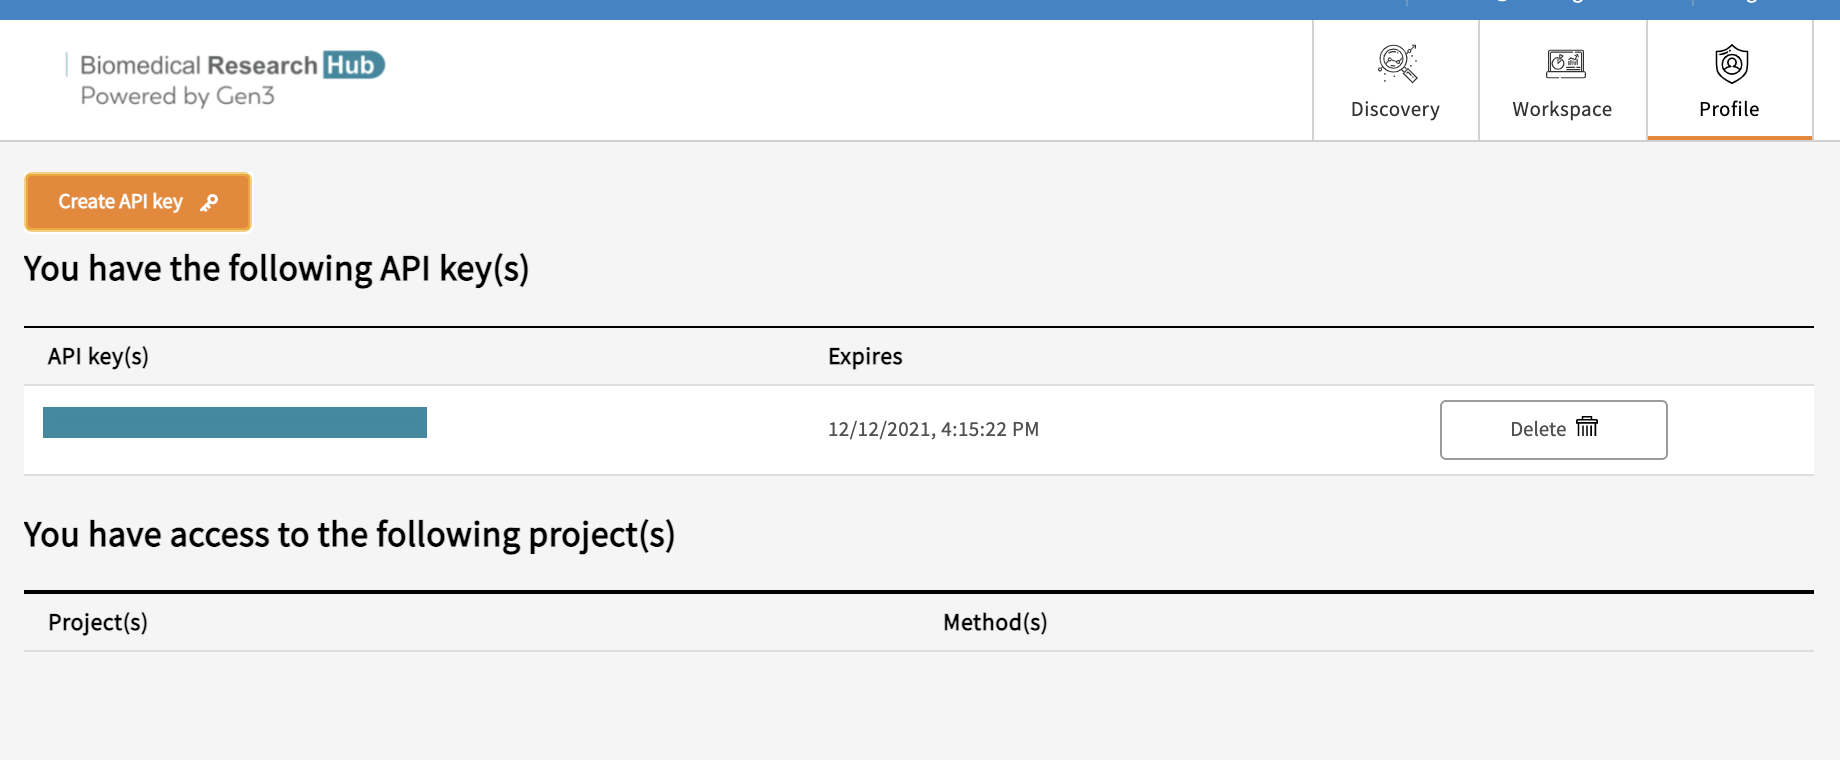
On the profile page users will find information regarding their access to projects, access to Gen3-specific tools (e.g. access to the Workspace), and the function to create API keys for credential downloads. API keys are necessary for the download of files using the Gen3 Python SDK.
5. Downloading Data Files
Users can download data files for work in the provided Workspace. Utilizing workspaces leverages CTDS-owned python software development kit (SDK) as well as a cloud based computing platform.
Note, that accessing data files requires linked access to all FAIR enabled repositories, as described here.
a) Download Data Files into a Workspace with the Python SDK
Users can load data files from a manifest created on the Discovery Page directly into a Workspace.
Below are the steps to do so.
-
Navigate to the Discovery Page. Link your accounts to FAIR repositories as described here.
-
Find the study or studies of interest by using the search
features or the list of accessible
studies.
-
Select the clickable boxes next to the studies.
Click on "Open in Workspace", which will initiate the Workspace Launcher.
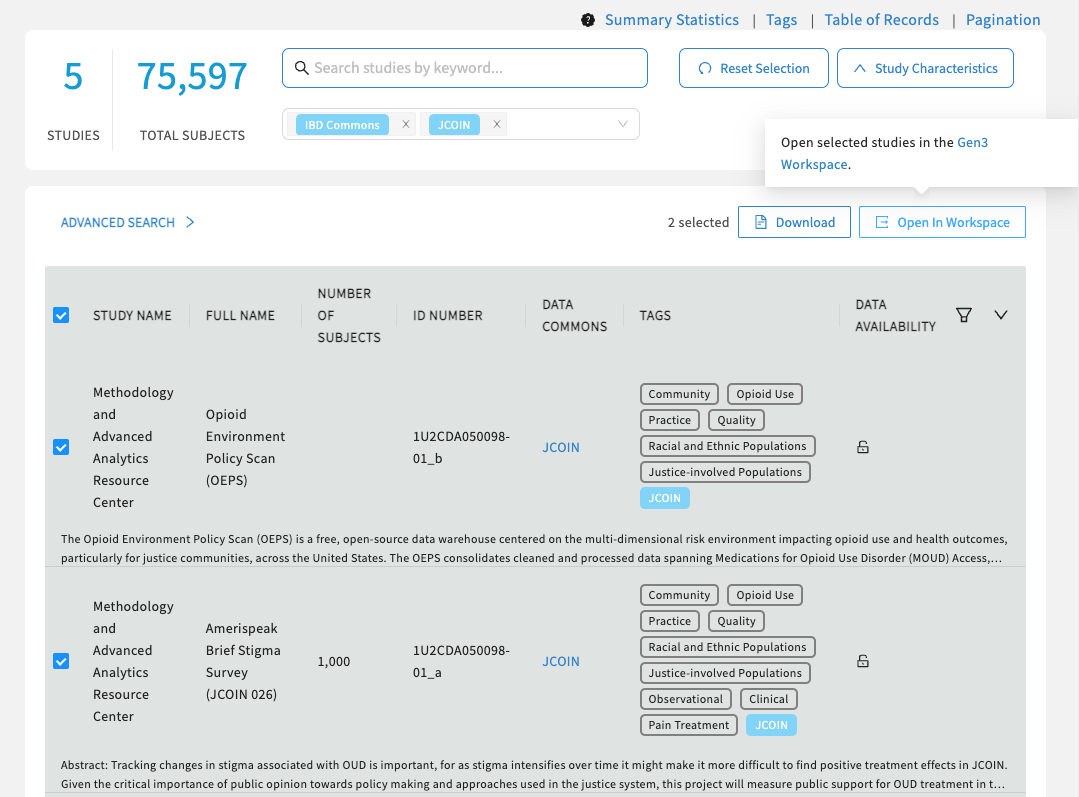
Select the studies and click "Open In Workspace".
-
The Workspace will be prepared and the selected data will be made available via a manifest placed in a time/date stamped directory in the following path: pd/data/brh.data-commons.org/exported-manifest-(time/date stamp)
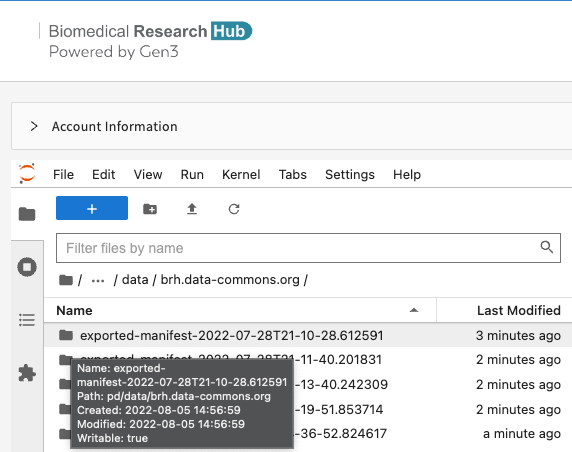
Please do not navigate away from this page until the download is complete. Created directory may take several minutes to load.
-
Once loaded, users can navigate into the directory and access either the manifest or an automatically generated notebook (i.e. data.ipynb) with instructions to download the data.
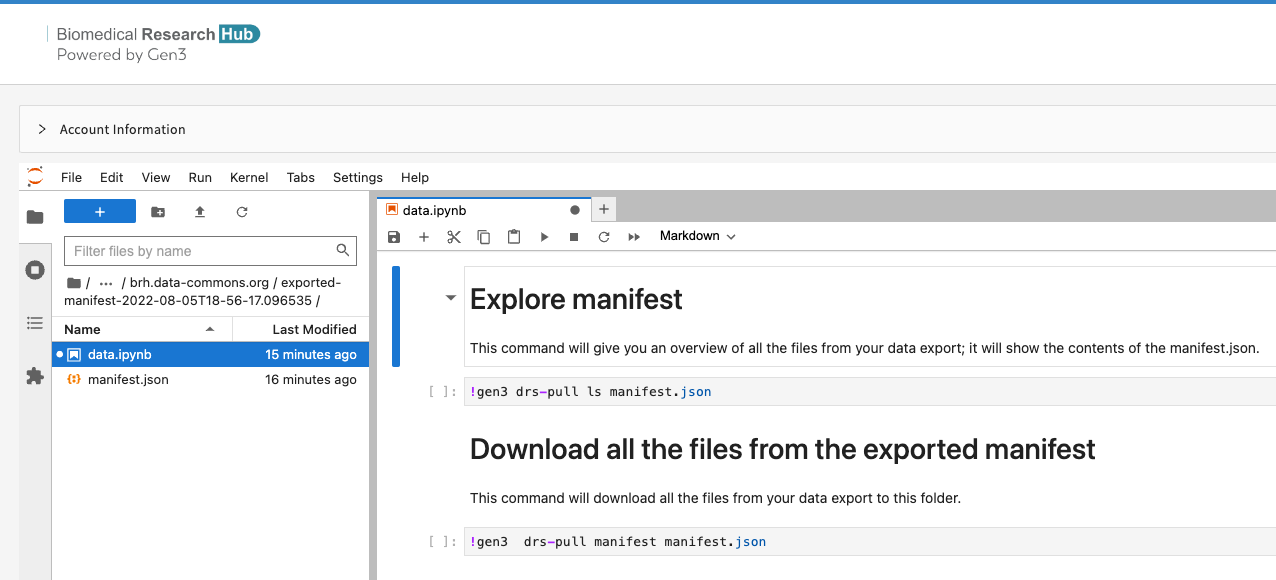
Users should note that the gen3-sdk is utilized in this notebook and directory to download data.
6. Contact
Need help? Please contact our help desk.
